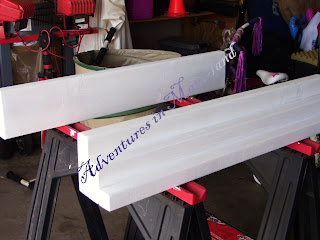
Here is the finished product!
Follow the link for a tutorial on how to build these!
Here is what you will need:
1 2x6
1 2x4
1 2x2
Chop saw, circular saw, or table saw
Saw horses or workbench
Wood glue
Clamp
Drill
3/32 drill bit
Screwdriver drill bit
Wood filler
Sandpaper (100 grit and 320 grit)
Tack cloths
Paintable caulk and smoothing tool (optional)
Water-based Primer
Latex paint (in the color of your choice)
Paintbrush
Level
Stud finder
8 - 2 1/2 " drywall screws
2 - 4" angle braces
4 - 2" screws
2 - 1/2" screws
The above materials will make one shelf with three tiers that are 2" deep and 2" high. I made two shelves. The width of the shelves are up to you. I made mine 34" long because I know that someday, they will come off the wall and be placed in a book shelf that will eventually be re-purposed. I also used wood beams, which makes these shelves quite heavy. You will want to be sure to attach them directly into the studs in the wall or use lighter materials.
To start, I purchased one each of a 2x6, 2x4, and 2x2 beams from the hardware store. I cut them all down to my desired length, 34", using a chop saw.
Next, I placed the 2x6 on a set of saw horses and put a bead of wood glue down the length of it. Then I put the 2x4 on top of it. Make sure both pieces are flush, and clamp.
Next, I marked four places to drill pilot holes. Just evenly space the holes down the length of the wood. Also transfer the marks to the 2x6. You will want to know where you inserted the screws in a little while.
 |
| Mark on 2x4 |
 |
| Transfer mark to 2x6 for future reference |
Then attach the screwdriver drill bit to the drill and insert 4 drywall screws into each hole. I used 2 and a 1/2" drywall screws so it would go through the first board without going all the way through the second board.
Next, I repeated this process with the 2x2. Run a bead of wood glue down the 2x4. Place the 2x2 on top of the 2x4, making sure it's flush, and clamp. Drill four pilot holes (make sure to offset them from where you inserted screws into the first two boards using the marks on the 2x6 as reference). Insert the drywall screws.
Now, apply wood filler to the four screws on the 2x2 and allow it to dry.
Once the wood filler is dry, sand all of the pieces of wood using a medium grit sandpaper (I used 100 grit).
Follow this up by sanding everything with an extra fine grit sandpaper (I used 320 grit).
Next, use a tack cloth to remove the dust from all surfaces.
This next step is optional. If you do not want to see a little gap where each piece of wood meets the one below from the front, you can run a bead of paintable caulk over the gaps. Smooth with a caulk smoothing tool and allow to dry. If you don't want to do this, skip ahead to priming.
The next step is to paint the wood with a water-based primer.
Once the primer is dry, paint using latex paint. The color I used is called Crescent Moon. It's a soft off-white. I chose this color because I have no clue what color the bookshelves (the future home of these shelves) will end up, so I went with something that is neutral and goes with anything - even the dull brown walls in the house we are currently renting! The number of coats depends on the type and color of paint you use. I did two coats.
After the paint has dried, you are ready to hang your new tiered shelves! Using your stud finder, find the studs in the wall where you will hang the shelves and mark them. Line up a 4" angle brace (they look like L's - I forgot to take pics of them before hanging...sorry!). Use a level to make sure it's straight and mark the holes. Use a drill bit to drill a pilot hole. Then attach a screwdriver bit to your drill and attach the brace to the wall. The size screw you use will be based on the type of braces you get. I used 2" screws. Use a level to determine where the second angle brace will go. Mark the holes, drill pilot holes, and attach with screws.
You're almost there! Now you just have to lay your shelf across the angle braces and get it into position. Mark the holes on the angle braces on the bottom of the shelf. Take the shelf down and drill pilot holes in the bottom, being sure not to drill all the way through! Put your shelf back up and insert screws through the braces and into the bottom of the shelf. Again, the screws you use need to be compatible with your brace. I used 1/2" screws. They need to be just long enough to go through the brace and into the shelf without going all the way through. I attached the shelf to the angle braces using only one screw in each brace.
Now...go to your stash and populate your new tiered shelf!


Fabulous!!! Love this idea!!!!!
ReplyDeleteThank you! I am really loving them!
DeleteThis is a great idea, and aehhhm, looks like is soon time to build another LOL
ReplyDeleteOh, I am waaayyyy over due to build another one. I was needing another one pretty much the day after I finished them! LOL
Delete