Showing posts with label Tape. Show all posts

06 July 2012

Feature Friday - Melting Popsicle Stripes

Happy Friday!  Today, I did a mani using Orly's Melt Your Popsicle.  I started with my base of SH Double Duty, and added three coats of Melt Your Popsicle.  I topped that off with a coat of SV.  Once it was dry, I used tape to create angled stripes.  I used my 1/8" painters tape cut in half to make it thinner.  Then I painted on one coat of SC Black on Black, topped with another coat of SV.  Finally, I added my virtual bandage.  :o)  Yup, another boo-boo.  I'm either very rough on my hands, or I'm accident-prone.  Have a great weekend, everyone!


29 June 2012

Feature Friday - Stars and Stripes

Hi all!  With the 4th of July just around the corner, I thought I would show you my Independence Day inspired mani before the weekend.

I started with my base of SH Double Duty.  I did two coats of ChG Frostbite and stamped the stars from Cheeky's CH 4 plate with SHXW White On.  I topped that with a coat of SV.  Then, I taped off a diagonal and painted on my favorite red, WnW 414.  I placed another piece of tape on the same diagonal and stamped the stripes from the same plate over the red with the White On.  Everything was topped with SV once more, and that's it!  Here is the plate and images I used:


Have a great weekend, everyone!

22 June 2012

Feature Friday - Neon Gradient Stripes

In the spirit of full disclosure, I had hoped to revisit the gradient mani.  However, I wasn't really crazy about the colors I chose.  I thought they would look a little more bright and summery, but the orange ended up being too muddy for my taste.  So, I decided to reach for my tape...and my virtual bandage!


I started with a base of SH Double Duty.  Then, I painted on two coats of ChG I'm With the Lifeguard, from their Summer Neons collection.  I sponged on ChG Papaya Punch to create a gradient.  I topped this was a coat of SV.  Then, I used my thin painter's tape (the roll is only about 1/8" thick).  Even at 1/8", this was still thicker than I wanted, so I cut each piece of tape in half length-wise to make it even thinner.  I added the strips of tape, and painted on one coat of SC Black on Black.  Then I topped it all with another coat of SV.


25 May 2012

Feature Friday - Floamy Stripes

Make sure you get entered into my Facebook giveaway for Layla Flash Black...ends Sunday!  I'll be showing you a swatch of this polish next week, so I'll skip those details.  I'm not really crazy with how this turned out.  I started with my SH Double Duty as a base, and added two coats of Floam by Nail-Venturous.  Since Floam is a top coat eater, I did two coats of SV.  Then, I taped off some stripes and painted on one coat of SC's Black on Black.  Unfortunately, since the Floam base was still a little rugged despite two thick coats of SV, the stripes look a little wonky.  Oh, well.  Lesson learned.  Have a great weekend, everyone!


20 April 2012

Feature Friday: National Day of Silence

Happy Friday!  So, Heidi over at DIY Polish and More came up with the idea of doing manis today in support of the National Day of Silence, and I jumped on board.  For those of you who do not know, the National Day of Silence is a day when students take a vow of silence to raise awareness of the silencing effect of bullying and harassment of the LGBT community.  You can learn more about it here

Here is the mani I came up with in support of the National Day of Silence.  I used the polishes shown below, which are (from left to right):  ChG Liquid Leather, SH Silver Sweep, WnW 414, OPI A Roll in the Hague, SH Lightening, Essie Pretty Edgy, and ChG Electric Beat.

I painted two coats of Liquid Leather on all of my nails, except for the accent.  I stamped the lips image from BM 02 (shown below) using Silver Sweep.  Then I used tape to create the line with 414.

My accent nail was done with the remaining colors using tape.  Thanks for looking, and I hope you will join in and take a vow of silence.  Have a great weekend, everyone!


Update:  Click here to see Heidi's mani!

06 April 2012

Feature Friday - Peep Show!

It's Friday! First, welcome new readers!  Only 10 away from an amazing giveaway!  I've been gathering goodies for you...OPI, Orly, Sinful.  Bouncing off the walls excited!  PLEASE help me get there!!!  Oh, and if you didn't notice, I've added a page where I will post other blogger's giveaways as I come across them.  Go check them out!

So, here I have my Easter mani.  You may have come across this before because it was featured on Nouveau Cheap's Easter round-up, which can be found here.  From one G to another G - thank you!!!  Sorry I didn't get "in-progress" pics on this mani.  I was a little pressed for time (what else is new?).

I started with my base of SH Double Duty.  Then I did two coats of OPI's Alpine Snow (despite the fact that she's such a bish to me - we have a very unhealthy love/hate relationship).  I free-handed the peeps using ChG Sweet Hook and Sinful's Unicorn.  I used a dotting tool to add the eyes using Orchid's Truffle Maker.  I topped them all off with Spoiled's Shaken Snow Globe (darn those craptastic brushes!).

After submitting this to Nouveau Cheap, I decided I needed something different on my thumb.  So I attempted an Easter basket.  It didn't come out as I'd hoped, but then, these things rarely do.  Oh, well.  I started with ChG Cha Cha Cha for the grass.  Then I added Orchid Truffle Maker for the basket.  Using my beloved tape, I added CC Antiquated to attempt a woven look (fail!).  Everything was topped with SV.  In the end, I thought it was cute and enjoyed doing it.  I am actually planning a different, more "classical" mani for Easter day.  I'll post that on Monday.

Enjoy your weekend, everyone!  And if you celebrate Easter...Happy Easter!


30 March 2012

Feature Friday - Raging Olive Squared

Happy Friday!  Today's mani happened because I was so loving the CQ Golden Green I put on a couple of days ago, which you can see again here.  So you already know I started with my base of SH Double Duty and put on two coats of Golden Green.  I used tape to mask off the lower right square and painted on Orly's Rage.  I topped them with a quick coat of SV and repeated the taping for the upper left quadrant.  I finished it all off with a another coat of SV and voila!  Thanks for being here with me and have a great weekend, everyone!!!


02 March 2012

Feature Friday - The Hemi Mani

Happy Friday and welcome to the newest three members of my blog!  Thanks so much for being here!!!  Inching our way closer to 50 and a giveaway!  I've been putting aside pretties for you guys!  Now on to the FF:

So I was swatching SH's Xtreme Wear in Pacific Blue.  While I was admiring the color, I found that it reminded me of the blue Hemi with white stripes, much like the one seen here.  So I added the white stripes using tape and OPI's Alpine Snow.  I started with my usual base of SH Double Duty and did two coats of the Pacific Blue.  I topped them off with SV.  I got a lot of compliments from men on this one!  The moral of the story is: The way to a man's heart is through a car-themed mani!  And a weird little coincidence...I went to the mall and when I came out, a car painted just like this was parked across from me.  Let me know your ideas for a car-themed mani!  Ready, set, go!  Have a great weekend, everyone!


21 February 2012

Tips, Tricks, and Tutorials Tuesday - Lightbox - And a Mardi Gras Mani!

First of all...hello and welcome!  17 and I'm so excited that each and every one of you are here!

If you've noticed, I'm trying to come up with different things to bring you throughout the week.  I have Feature Friday, which is the "experimental mani of the week."  Sometimes they are great, other times, not so much.  And now Tips, Tricks, and Tutorials Tuesday.  I would like to use these posts to tell you about things I've tried, made, etc.  Maybe they'll be great ideas and maybe not so much.  That's where the adventure comes in!

So today, I'm bringing you my tutorial for making a lightbox.  There are many different variations out there.  As a former, semi-pro photographer, I found this to work the best for me.  Also, bear in mind that my experience in photography was in 35mm film.  My digital camera is actually a hand-me-down that's quite old and does not have a very good lens.

First, why a lightbox?  A lightbox allows you to take photos of objects (or manis) with a continuous, uncluttered background.  It also helps to minimize glares and distracting shadows.  The indirect or diffused lighting also avoids hot spots that usually result when you take photos using an on-camera flash (especially fixed flashes on point-and-shoot cameras).

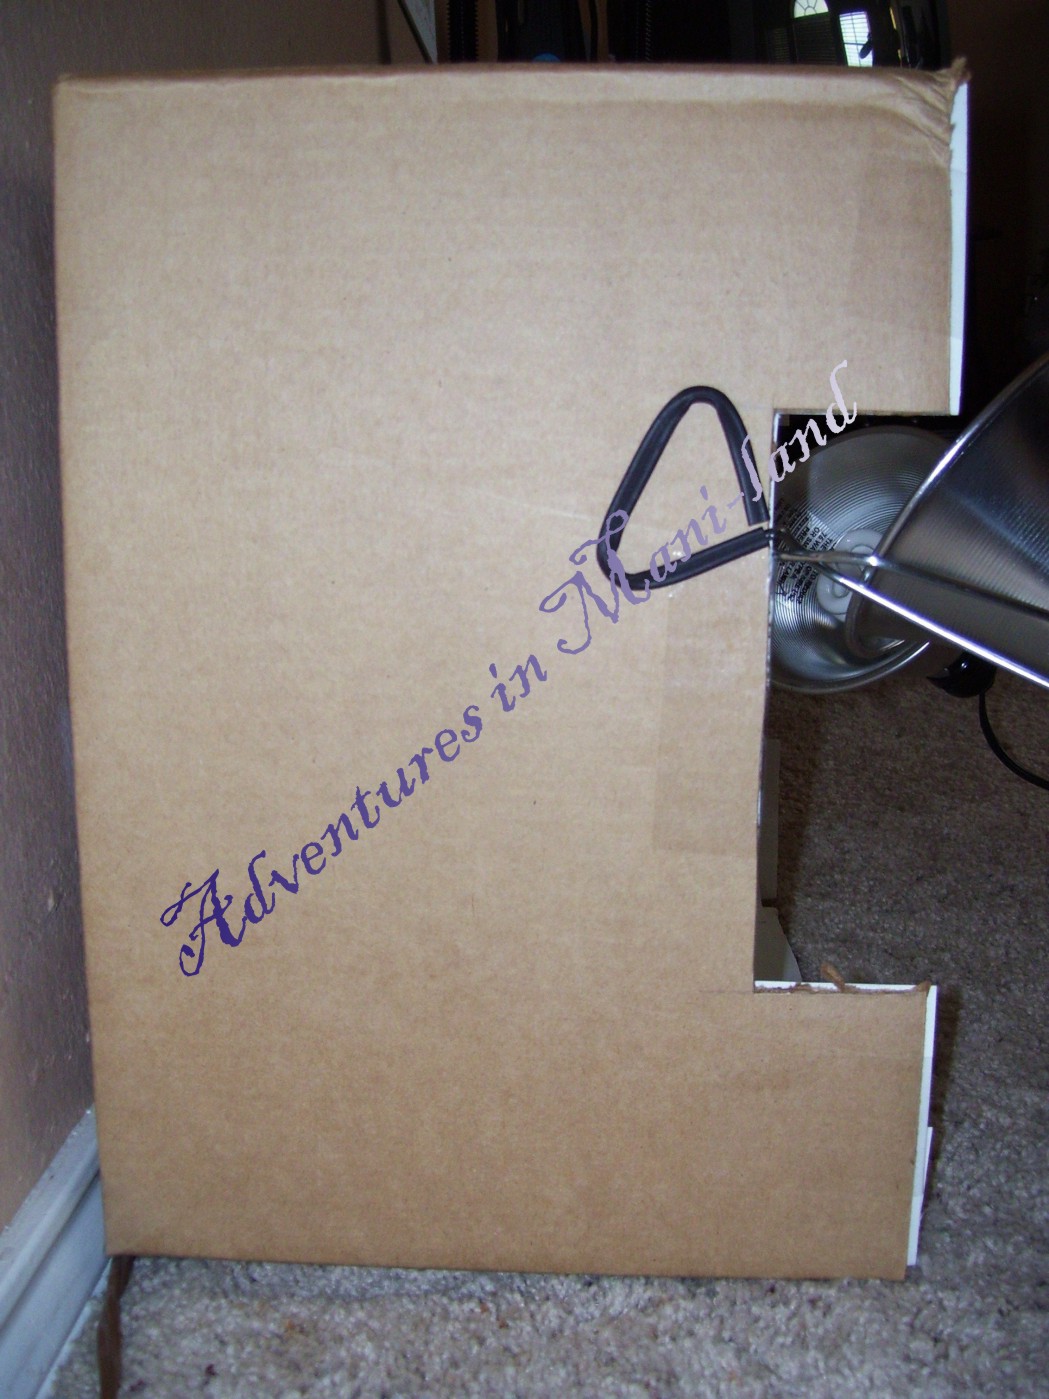
For my lightbox, I decided to use as many materials as possible that I already had on hand.  Plus, I did not want to make it out of foam core since I move a lot and it would be destroyed during the next move.  You can absolutely make this out of white foam core (available at any craft store) to save some work.  I used a cardboard box I had left over from the holidays.  That's my sweet Hubberoo doing the cutting for me!

I wanted my lightbox to be square, so the width of my existing box dictated the finished size.  Since the box was 15" wide, I (or should I say, the Hubberoo) cut it down to be 15" long.  He just cut out the back and left the sides.  The sides were then able to be folded up to create the new bottom (shown below).

Some lightboxes have holes cut in the sides with the holes covered with tissue paper.  Lights would then be positioned outside the box, as in the diagram below.


I did not want to use this setup because I would prefer to fill the box with indirect light instead of using a diffused light.  It can be difficult to diffuse the light effectively to avoid hot spots, glare, and shadows.  So I cut two notches from each side.  The notches were approximately 2" x 7".  The purpose of the notches is to get the lights to be slightly recessed into the box to effectively bounce the light off the top of the box and down onto the object(s).


Next, I lined the box with matte white poster board (glossy poster board will cause glares).  I cut the  white poster board to fit both of the sides and the top of the box.  I attached the pieces using double sided tape.  Then I measured the back and bottom of the box and cut one piece of poster board to cover both surfaces.  I did this to create a continuous piece of poster board to serve as a backdrop with no seams or creases.


Now all that's left to do is attach your lighting!  I picked up two work lights from a hardware store.  I also grabbed two bulbs.  I will tell you to save your money on the bulbs!  All you need are low watt (mine are 60 watt equivalent) daylight bulbs.  I paid about $6.00 for a package with two bulbs.  Some people will tell you to splurge on more expensive bulbs.  This is absolutely not necessary unless you are using a very expensive, high-end camera.  Most of the point-and-shoot digital cameras are not sophisticated enough to pick up small deficiencies in regular daylight bulbs.


I attached my lights to the notches in the sides of the box and angled them up to the top of the box.  You may have to play with the angles a bit to find what works best.  Take some test shots and look for glares or shadows and adjust your lights as needed.  Here is what mine look like:

Lights off
Lights on
And the results!


Hope this helps you!  And remember, this is what worked best for me.  There are tons of options for building a lightbox.  Go with what works and what is easiest for you to do.  If you made a lightbox recently, let me know in the comments so I can check it out!

And since it's Fat Tuesday, I am throwing in a quick Mardi Gras mani!  I used Revlon's Not So Blueberry as the base.  Then I added SH Insta-Dri in Jumpin' Jade and ChG Champagne Bubbles on my accent nail using tape.  Topped it all with SV.  Enjoy!


13 February 2012

Chalkboard VDay Math Mani

I'm getting this in just under the wire (unlike my day late Superbowl mani!).  The day before Valentine's Day and here is my mani!  If you've figured it out by now, I am not a pinky flowery type of gal.  So I was trying to figure out how to do a Valentine's Day mani that was more ME.  Then I remembered something my hubberoo always used to say about us...one plue one equals one.  Awww!  The simple math made visions of chalkboards dance in my head (blame the teacher in me - we love chalkboards!).  So here is the mani...

I started with SH Double Duty as a base.  Then I used two coats of CG Liquid Leather topped with one coat of Essie's Matte About You.

Then I used tape (since my freehand sucketh) to do the math using OPI's Alpine Snow.  I finished it off with a teeny tiny pop of color by using CG's For Audrey to make a heart on my thumb.  First time trying dotting...not too shabby.  Sadly, my practice heart came out better than the ones on my thumbs.  Oh, well.  Can't wait to show the hubberoo!


And yes, I forgot to flip two of the photos prior to watermarking and didn't feel like going back to fix it.  Been that kind of day!

10 February 2012

Feature Friday: A Mermaid's Tale

Hello again!  I was wanting to have my Friday Feature done last night so you would get the pics sooner, but that just did not happen.  Hubberoo has been sick, child's been stubborn, and it's been a long, crazy week full of meetings and homework.  Oh, well.

I don't know why, but I had visions of mermaids and Erika over at Chloe's Nails inspired me to break into my new Big Ruby nail tats!  I got these on sale and you can find them here.

I started with SH Double Duty as a base, two coats of 10's Pinky Promise, and one coat of SV.

Then I taped off my tips (except for my accent nail) and used Spoiled's Good Karma.  Finished them with a coat of SV.

Next, I used my Big Ruby nail tat from their Sea collection.  I wanted this to look like a mermaid diving into the mist, so I took the larger shark tat and cut it in half.  Now I need to think of a mani to use the shark's head...thoughts?  After I applied the tat, I used Spoiled's Shaken Snow Globe on the bottom half of my nail.

Then I layered Sinful's Call You Later on the bottom third of the accent nail.


Followed this with a layer of Sinful's Nail Junkie on just the tip of the accent nail.

To finish up, I used Shaken Snow Globe to kind of blend it all together and topped with SV.  Hope you like it!