Showing posts with label Black. Show all posts

28 June 2013

12 Colors Rhinestones Kit Review - Born Pretty Store

Happy Friday!  Despite my ravaged cuticles (due to neglect thanks to crazy, busy life stuff), I had a lot of fun doing this mani to review a product from Born Pretty Store.  First, the product.  This is their 12 Colors Rhinestone Acrylic UV Nail Art Kit W/Box & Pen.
 
There are two 12-compartment boxes filled with rhinestones and a rhinestone picking tool (fancy term for wax pencil).

One box contains 6 compartments of black rhinestones, and 6 compartments of crystal/clear rhinestones.

The other box is an assortment of colors.  There is crystal/clear, red, aqua, black, yellow/green, lavender, blue, green, orange, pink, light blue, purple. 

The wax pencil is something you could probably get from a craft store.  But since it came with the kit, bonus!

I really love the assortment of colors.  I do wish that the compartments in the assorted box did not contain more black and crystal/clear rhinestones since you get a whole box of just those.  I would have liked to have seen two other colors included instead.  Overall, the assortment and number of total rhinestones included is excellent.  It is really a deal, priced at $7.59.  And you can use coupon code GMG10 to get 10% off (you can always find this in my sidebar...check it out!).

The rhinestones are great quality.  And can I say how much I love the boxes!  Each compartment is numbered.  They are great storage boxes that can be re-used.  Love that!  And I must say, the wax pencil/picker tool made easy work of picking up and placing the rhinestones.  So...on to the mani!

First, a quick explanation.  Waaaayyyy back when I was in junior high and high school, I used to love playing around with nail polish.  Believe it or not, this was not a very popular practice back then (yes, it was THAT long ago).  My favorite go-to mani was to paint my nails to look like dice.  No tools, just good old-fashioned patience with bottles of white and black polish.  I would occasionally even paint my pinky as a red die (the advent of the accent nail???).  Someday, I will go through my old box of pictures from that time to see if I can find one that shows my nails.  But for now, you'll just have to take my word for it.

Anyway, when I saw that box half-filled with black rhinestones, I decided to go way back in time to recreate the look using rhinestones.  First of all, SO much easier than using polish.  Wish I had these...er, um, cough, cough, hack...*mumble* years ago.

I started out with a base of SH Double Duty, and added two coats of SC Snow Me White.  Then, using a little dollop of SV, I used the picker tool to pick up and place the black rhinestones.  I finished with a coat of SV and BAM...I was transported back in time.  Like I said, ignore the cuticles.  Sorry about that.  Truly trying to get my rear in gear.


This product was sent for review.


13 August 2012

I'm Swatchin' You - Zoya Chloe

Hi all!  Thanks for sticking with me while I took my much needed mini vacay.  I'm back and ready to go!  Today, I've got Zoya Chloe, a flakie in a pink-tinged clear base.  I'm pretty sure this is the only flakie I own.  I'm not usually a big fan, but something about this one just caught my eye.

The formula on this was fantastic.  Chloe goes on very smoothly.  As always, I am showing you Chloe in her natural state so you can see what it actually looks like.  In case you were wondering, I have a reason for doing this.  Most of the time, people will swatch polishes that were meant to be layered.  Makes sense, right?  However, I always wonder just what the base actually looks like, how opaque it is, what the glitter/flakies look like without the influence of another color, etc.  So, I find it helpful to see what it actually looks like on its own.  This also helps me decide whether or not I really want it, or how similar it is to what I already have.  Then, I show it over white and black, so you have an idea of how it looks layered over a light and dark color.  I'd love to hear your thoughts on this.

Below, you are looking at Chloe, from left to right, in one coat, two coats, one coat over white (OPI Alpine Snow), and one coat over black (ChG Liquid Leather).

  
Over white, Chloe adds a tinge of pink, and the flakies appear pink and purple with flashes of orange, which I couldn't pick up well on camera.


And here is the one coat over black from different angles.  Over black, Chloe flashes green and orange.


SH Double Duty and SV as base and top.


06 July 2012

Feature Friday - Melting Popsicle Stripes

Happy Friday!  Today, I did a mani using Orly's Melt Your Popsicle.  I started with my base of SH Double Duty, and added three coats of Melt Your Popsicle.  I topped that off with a coat of SV.  Once it was dry, I used tape to create angled stripes.  I used my 1/8" painters tape cut in half to make it thinner.  Then I painted on one coat of SC Black on Black, topped with another coat of SV.  Finally, I added my virtual bandage.  :o)  Yup, another boo-boo.  I'm either very rough on my hands, or I'm accident-prone.  Have a great weekend, everyone!


02 July 2012

I'm Swatchin' You - Wet 'n' Wild Back Alley Deals

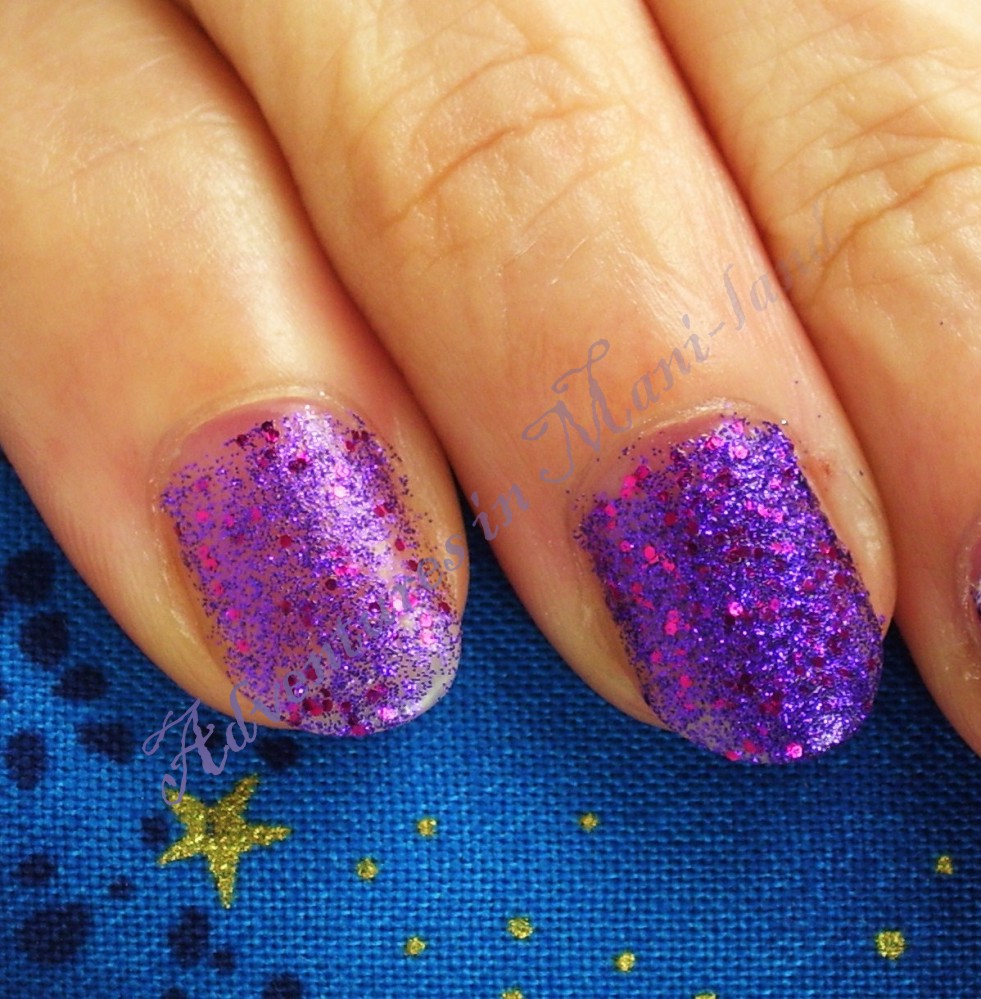
Hopefully, if I chuck some glitter at you, it will give you a happy, sparkly Monday!  This is from Wet 'n' Wild's Color Icon line.  It's called Back Alley Deals, and it's purple micro glitter and dark pink round glitter in a clear base.
 

The glitter is very dense, so you get really good coverage in only one coat.  But, it is difficult to get even coats.  Your first brush stroke is pretty dense, but subsequent strokes are sparse.  So, be sure to re-load your brush for each stroke.  From left to right below, you are looking at one coat, then two coats, one coat over white (OPI Alpine Snow), and one coat over black (ChG Liquid Leather).
L to R: One coat, two coats, one coat over white, one coat over black
This also dries matte and gritty.  The two nails on the left have no top coat so you can see the natural matte finish.  The good news is that even though this dries gritty, it is not a top coat eater.  I added one layer of my top coat, and it is perfectly smooth.  The top coat also really brings out the shine in the glitter.


L to R: One coat and two coats with no top coat

L to R: One coat over white, then black with one layer of top coat
I used SH Double Duty and SH Insta-Dri for my base and top coats.


28 June 2012

I'm Swatchin' You - New York Color Starry Silver Glitter

Hello!  So, I bought this next polly at the same time that I bought my other NYC polishes, so it's fairly old.  It's called Starry Silver Glitter.  I actually saw this in a store recently, so they still make it.  It's holo micro glitter and blue and silver round glitter in a clear base.


The formula is very good.  It went on smoothly and evenly.  However, you do have to work to get the round glitter on your nail.  I actually didn't try too hard, so that's why there is not much in terms of the round glitter.  It dries shiny, but you need a top coat if you are looking for high shine.  I did not use a top coat so you could see the natural finish.  And it is not gritty at all.  Left to right below, you are looking at two coats over black (ChG Liquid Leather), two coats over white (OPI Alpine Snow), two coats, and one coat.
L to R: Two coats over black, two coats over white, two coats, one coat

L to R: Two coats, one coat

L to R: Two coats over black, two coats over white
I used SH Double Duty as a base.

22 June 2012

Feature Friday - Neon Gradient Stripes

In the spirit of full disclosure, I had hoped to revisit the gradient mani.  However, I wasn't really crazy about the colors I chose.  I thought they would look a little more bright and summery, but the orange ended up being too muddy for my taste.  So, I decided to reach for my tape...and my virtual bandage!


I started with a base of SH Double Duty.  Then, I painted on two coats of ChG I'm With the Lifeguard, from their Summer Neons collection.  I sponged on ChG Papaya Punch to create a gradient.  I topped this was a coat of SV.  Then, I used my thin painter's tape (the roll is only about 1/8" thick).  Even at 1/8", this was still thicker than I wanted, so I cut each piece of tape in half length-wise to make it even thinner.  I added the strips of tape, and painted on one coat of SC Black on Black.  Then I topped it all with another coat of SV.


15 June 2012

Feature Friday - Black on Pink Polka Dots

I hate to admit this, but I love black with pink.  So I decided to try stamping some black polka dots over a pink base.

I started with SH Double Duty as a base.  I painted on three coats of CC I Believe in Amour (from my mismatched Ross set, so the name is questionable).  Then I stamped using SC Black on Black.  The polka dots are from Cheeky's CH6 plate, shown below.

On the accent nail, I decided to go with the bow from CH15, shown below.

I topped them off with a coat of SV to finish.


The polka dots didn't transfer completely.  Is it just me, or do they look like little black olives?  LOL

13 June 2012

I'm Swatchin' You - China Glaze Liquid Leather

Goooood morning!  This next polish is the very first China Glaze (ChG) polish I ever bought, because you can never have enough black!  It's a black jelly called Liquid Leather, as I'm sure many of you already know.  Of course, ChG makes great polish, and this one is no different.  Their brushes are pretty good.  However... (isn't there always a however with me?)  It does drag a bit on the first coat with this color.  But once you get a second coat on, it smooths right out.  Great coverage in two coats, and tons of shine...normally.  I decided to mattify it because nothing is hotter than a matte black.  Yum!

On a side note, do NOT try stamping with this black.  How do I know, you may ask?  EPIC. FAILURE.  That's how I know.  Very stressful day...I can't even go back there. *curling into the fetal position and sucking thumb*


SH Double Duty and Essie Matte About You for base and top.


25 May 2012

Feature Friday - Floamy Stripes

Make sure you get entered into my Facebook giveaway for Layla Flash Black...ends Sunday!  I'll be showing you a swatch of this polish next week, so I'll skip those details.  I'm not really crazy with how this turned out.  I started with my SH Double Duty as a base, and added two coats of Floam by Nail-Venturous.  Since Floam is a top coat eater, I did two coats of SV.  Then, I taped off some stripes and painted on one coat of SC's Black on Black.  Unfortunately, since the Floam base was still a little rugged despite two thick coats of SV, the stripes look a little wonky.  Oh, well.  Lesson learned.  Have a great weekend, everyone!


30 April 2012

Review - SoFlaJo Wilde Irish Rose

Happy Monday!  Don't forget about my giveaway!

Today, I get to do my very first "official" review!  The polish is called Wilde Irish Rose by SoFlaJo.  It is from her new limited edition Spring Flowers Collection, and is only available during the spring.


The base is tinged pink, and almost looks iridescent.  There is pink and gold micro glitter, and you can also pick out flashes of green and gold through iridescent bar glitter.  The formula on this was great.  It went on smoothly and evenly with each coat.  As a glitter, you can either layer it or build it up on its own.  With that being said, I'm showing this to you both ways!

From left to right, you are looking at one coat, two coats, two coats over white (OPI Alpine Snow), and two coats over black (ChG Liquid Leather).  I did not use a top coat, because this polish does dry to an almost satin finish, which I wanted you to be able to see.  If you want that high shine, you will need a top coat.  Also, the natural finish is not very gritty at all, so it should not eat your top coat.

L to R: One coat, two coats, two coats over white, two coats over black


Then, to show how it builds, what you see below is three coats on the left and four coats on the right.

L to R: Three coats, four coats

Layering Wilde Irish Rose over black really brings out the base.  However, layering over white highlights the glitter.  I thought I would love this polish over black, but I think it looks best in all it's natural glory!

You can purchase this from SoFlaJo's shop page here.  It can also be purchased through her Etsy shop here.  While you are there, be sure to check out her other collections.  Her Year of the Dragon line looks incredible!

This product was provided for review.

26 April 2012

I'm Swatchin' You - Icing Witch's Brew

Wow!  So, yeah...looks like I'll be posting my 100 follower giveaway immediately after this one ends!  LOL  Not to mention needing to gear up a Facebook giveaway, too!  Prepare for lots of opportunities to walk away with free stuff!

Today, I'm showing you a swatch I did a little while back and apparently forgot about!  I decided to brave another Icing polish.  This one is called Witch's Brew.  I simply could not resist that name!  LOVE IT!  And the color is great, too.  It's a black jelly base with green sparkle...what's not to love?  It does dry to an almost satin finish, so a top coat is a must to get that shine!  Thankfully, the brush on this one was acceptable, but the formula was once again goopy.  I tried to get some good sun pics to show the sparkle.  Hopefully you can see it.  Enjoy and don't forget about my giveaway!


SH Double Duty and SH Insta-Dri for base and top.