Showing posts with label Layer. Show all posts

13 August 2012

I'm Swatchin' You - Zoya Chloe

Hi all!  Thanks for sticking with me while I took my much needed mini vacay.  I'm back and ready to go!  Today, I've got Zoya Chloe, a flakie in a pink-tinged clear base.  I'm pretty sure this is the only flakie I own.  I'm not usually a big fan, but something about this one just caught my eye.

The formula on this was fantastic.  Chloe goes on very smoothly.  As always, I am showing you Chloe in her natural state so you can see what it actually looks like.  In case you were wondering, I have a reason for doing this.  Most of the time, people will swatch polishes that were meant to be layered.  Makes sense, right?  However, I always wonder just what the base actually looks like, how opaque it is, what the glitter/flakies look like without the influence of another color, etc.  So, I find it helpful to see what it actually looks like on its own.  This also helps me decide whether or not I really want it, or how similar it is to what I already have.  Then, I show it over white and black, so you have an idea of how it looks layered over a light and dark color.  I'd love to hear your thoughts on this.

Below, you are looking at Chloe, from left to right, in one coat, two coats, one coat over white (OPI Alpine Snow), and one coat over black (ChG Liquid Leather).

  
Over white, Chloe adds a tinge of pink, and the flakies appear pink and purple with flashes of orange, which I couldn't pick up well on camera.


And here is the one coat over black from different angles.  Over black, Chloe flashes green and orange.


SH Double Duty and SV as base and top.


12 July 2012

I'm Swatchin' You - Pure Ice First Love

Sorry I didn't get this posted yesterday.  This is Pure Ice's First Love.  It's a pink sheer iridescent frost.  The formula and brush were great.  The only downside is that the frost finish means lots of visible brush strokes.

Since it's meant to be layered, I'm showing you First Love on it's own and layered over white (OPI Alpine Snow) and black (ChG Liquid Leather).  You can see from my middle finger that this would actually build up quite nicely on its own.  You just have to be willing to take the brush strokes (the bad) with the good.  And please pardon my ring finger.  I dinged it not once, but twice, while taking pics.  Grrrr.

L to R: One coat, two coats, one coat over white, one coat over black

 SH Double Duty and Insta-Dri as base and top.


02 July 2012

I'm Swatchin' You - Wet 'n' Wild Back Alley Deals

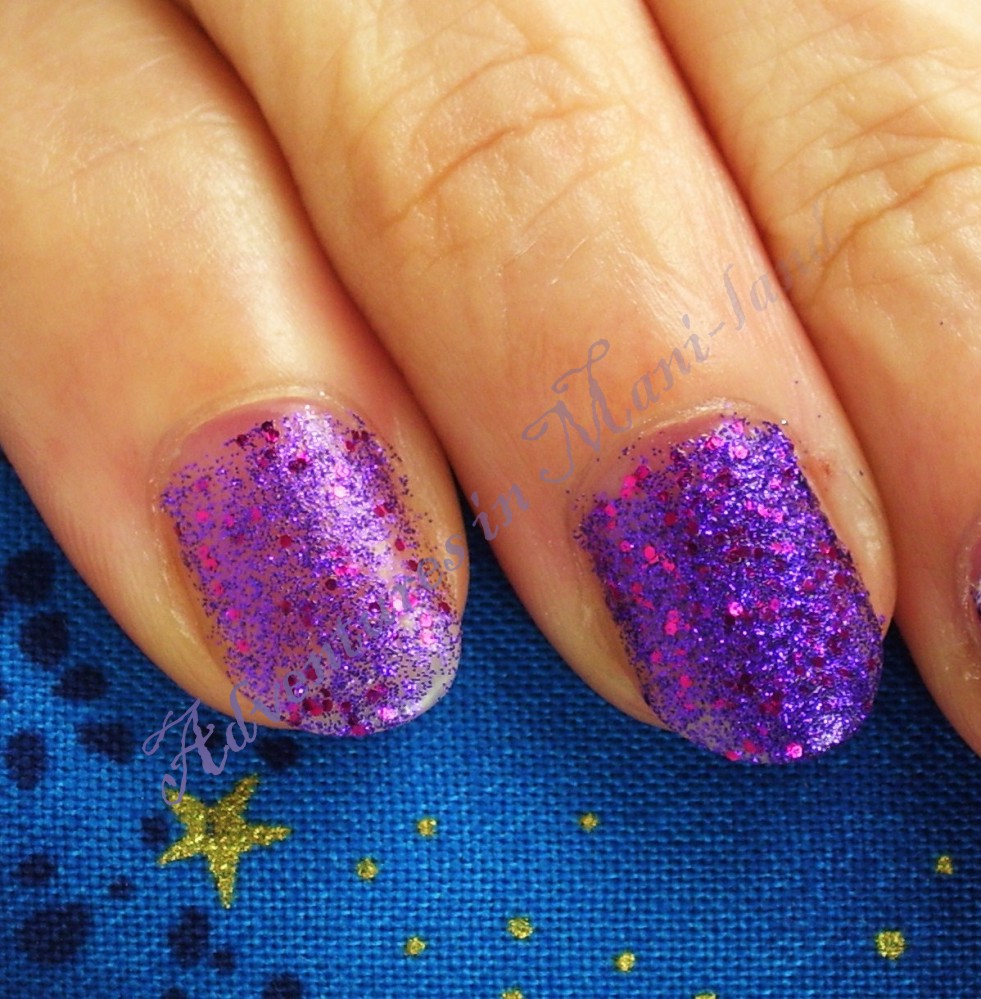
Hopefully, if I chuck some glitter at you, it will give you a happy, sparkly Monday!  This is from Wet 'n' Wild's Color Icon line.  It's called Back Alley Deals, and it's purple micro glitter and dark pink round glitter in a clear base.
 

The glitter is very dense, so you get really good coverage in only one coat.  But, it is difficult to get even coats.  Your first brush stroke is pretty dense, but subsequent strokes are sparse.  So, be sure to re-load your brush for each stroke.  From left to right below, you are looking at one coat, then two coats, one coat over white (OPI Alpine Snow), and one coat over black (ChG Liquid Leather).
L to R: One coat, two coats, one coat over white, one coat over black
This also dries matte and gritty.  The two nails on the left have no top coat so you can see the natural matte finish.  The good news is that even though this dries gritty, it is not a top coat eater.  I added one layer of my top coat, and it is perfectly smooth.  The top coat also really brings out the shine in the glitter.


L to R: One coat and two coats with no top coat

L to R: One coat over white, then black with one layer of top coat
I used SH Double Duty and SH Insta-Dri for my base and top coats.


28 June 2012

I'm Swatchin' You - New York Color Starry Silver Glitter

Hello!  So, I bought this next polly at the same time that I bought my other NYC polishes, so it's fairly old.  It's called Starry Silver Glitter.  I actually saw this in a store recently, so they still make it.  It's holo micro glitter and blue and silver round glitter in a clear base.


The formula is very good.  It went on smoothly and evenly.  However, you do have to work to get the round glitter on your nail.  I actually didn't try too hard, so that's why there is not much in terms of the round glitter.  It dries shiny, but you need a top coat if you are looking for high shine.  I did not use a top coat so you could see the natural finish.  And it is not gritty at all.  Left to right below, you are looking at two coats over black (ChG Liquid Leather), two coats over white (OPI Alpine Snow), two coats, and one coat.
L to R: Two coats over black, two coats over white, two coats, one coat

L to R: Two coats, one coat

L to R: Two coats over black, two coats over white
I used SH Double Duty as a base.

30 April 2012

Review - SoFlaJo Wilde Irish Rose

Happy Monday!  Don't forget about my giveaway!

Today, I get to do my very first "official" review!  The polish is called Wilde Irish Rose by SoFlaJo.  It is from her new limited edition Spring Flowers Collection, and is only available during the spring.


The base is tinged pink, and almost looks iridescent.  There is pink and gold micro glitter, and you can also pick out flashes of green and gold through iridescent bar glitter.  The formula on this was great.  It went on smoothly and evenly with each coat.  As a glitter, you can either layer it or build it up on its own.  With that being said, I'm showing this to you both ways!

From left to right, you are looking at one coat, two coats, two coats over white (OPI Alpine Snow), and two coats over black (ChG Liquid Leather).  I did not use a top coat, because this polish does dry to an almost satin finish, which I wanted you to be able to see.  If you want that high shine, you will need a top coat.  Also, the natural finish is not very gritty at all, so it should not eat your top coat.

L to R: One coat, two coats, two coats over white, two coats over black


Then, to show how it builds, what you see below is three coats on the left and four coats on the right.

L to R: Three coats, four coats

Layering Wilde Irish Rose over black really brings out the base.  However, layering over white highlights the glitter.  I thought I would love this polish over black, but I think it looks best in all it's natural glory!

You can purchase this from SoFlaJo's shop page here.  It can also be purchased through her Etsy shop here.  While you are there, be sure to check out her other collections.  Her Year of the Dragon line looks incredible!

This product was provided for review.

27 February 2012

I'm Swatchin' You - New York Color East Village and a Layering Experiment

Happy Monday! I have an electrified sheer blue to shock you into gear for the week.  This next swatch is from NYC's In a New York Color Minute line.  It's called East Village (love that!), so you know it has sass!  The color is a shimmery sheer teal that makes me think of mermaids.  It would look gorgeous over a light base.  But of course, since I'm swatching, I wanted you to see it in all of it's natural glory!  Easy application with a decent brush.


  SH Double Duty and SH Insta-Dri for base and top.

Update: I got some recommendations from some folks over at MUA for layering ideas with this color.  The suggestions were:
Jelly sandwich with a black glitter
Layer over pale yellow
Layer over navy
Layer over OPI Be a Dahlia, Won't You

I found that I did not have a black glitter, so I used the darkest glitter I had in a clear base, which was Sinful's Call You Later.  (Mental note: add a black glitter to stash!)  For the pale yellow, I used Sinful's Unicorn.  The navy I used, which was the only "straight"' navy I had, was ChG's Frostbite.  And since I did not have the OPI color, the closest color I had was Icing's Cherry Blossom.  I decided to add an idea of my own.  For some reason, I thought this color would look great with black lace.  So I painted my thumb with OPI's Alpine Snow and topped it with East Village.  Then I used some black lace I had to add a lace tip.

On a side note, I tried using Maybelline's Express Finish top coat.  I have to say it was crap-tastic.  It did absolutely nothing for drying my nail polish quickly.  I think I bought this years ago to use with my daughter's manis when I wanted a cheap QDTC.  It does apply well, so I will just keep it on hand as a regular top coat.  Enjoy the experimental pics!  Oh, and since I knew this would come off as quickly as it went on, I was not too careful with application and didn't bother with clean up.  Deal with it! :o)

L to R: NYC East Village, OPI Alpine Snow, Sinful Call You Later, Sinful Unicorn, ChG Frostbite, Icing Cherry Blossom

L to R: Jelly Sandwich with Call You Later, layered over Unicorn, layered over Frostbite, layered over Cherry Blossom


Layered over Alpine Snow with black lace tip

10 February 2012

Feature Friday: A Mermaid's Tale

Hello again!  I was wanting to have my Friday Feature done last night so you would get the pics sooner, but that just did not happen.  Hubberoo has been sick, child's been stubborn, and it's been a long, crazy week full of meetings and homework.  Oh, well.

I don't know why, but I had visions of mermaids and Erika over at Chloe's Nails inspired me to break into my new Big Ruby nail tats!  I got these on sale and you can find them here.

I started with SH Double Duty as a base, two coats of 10's Pinky Promise, and one coat of SV.

Then I taped off my tips (except for my accent nail) and used Spoiled's Good Karma.  Finished them with a coat of SV.

Next, I used my Big Ruby nail tat from their Sea collection.  I wanted this to look like a mermaid diving into the mist, so I took the larger shark tat and cut it in half.  Now I need to think of a mani to use the shark's head...thoughts?  After I applied the tat, I used Spoiled's Shaken Snow Globe on the bottom half of my nail.

Then I layered Sinful's Call You Later on the bottom third of the accent nail.


Followed this with a layer of Sinful's Nail Junkie on just the tip of the accent nail.

To finish up, I used Shaken Snow Globe to kind of blend it all together and topped with SV.  Hope you like it!


07 February 2012

12! And I'm Swatchin' You - Hazel Bishop Smoked Purple

First of all...I'm so excited to have 12 followers!!!  LOL  It's the little things in life that make me so very happy!  Welcome, new people!  I really appreciate that you are all here with me...YAY!!!

Okay, in my little collection o' polish, I have some obscure colors that I've had forever.  My mild OCD simply will not allow me to swatch my collection while skipping these obscure colors.  Therefore, I had to do it!

This one is from Hazel Bishop Porcelain Glaze.  It is called Smoked Purple.  This color is meant to be layered (as you can see from the crazily obvious VNL), but since one of my goals right now is to swatch everything straight from the bottle, I used it on its own.  The color is like a pinkish purple...almost a cross between an opalescent and a duochrome.  It would look great over a white or probably even black base.  Application was actually quite smooth and even.  May have to play with this one...


And so I did!  I decided to try layering it.  I happened to have done a quick mani using Icing's Hazelnut, which I have already swatched.  So I layered this Smoked Purple on top of one nail just to see how it would look and ended up with a cool purple.  The top left pic is Hazelnut on its own.  The right pic is Smoked Purple over Hazelnut.  The bottom left pic shows you a comparison between the two.  Thoughts?

SH Double Duty and SH Insta-Dri for base and top (are you getting tired of reading that yet?)  :o)