Happy Monday! I actually have a blue for your Blue Monday this week. This is China Glaze's Frostbite. I LOVE this color! It's a gorgeous royal blue with a bit of shimmer. The formula was very easy to work with. It went on smoothly, and I got great coverage. This was opaque in two coats.
Base SH Double Duty. Top SV.
11 June 2012
I'm Swatchin' You - China Glaze Frostbite
Labels:
Blue,
China Glaze,
Sally Hansen,
Seche Vite,
Swatch
08 June 2012
Feature Friday - Wild Candy Gradient
Okay...you know how I said that some of my adventures would be bad ones? Well, here is a great example! But, it was a learning experience, and I thought some of you may benefit from my lessons learned. Therefore, I am (somewhat reluctantly) showing you the good, the bad, and the downright ugly. I attempted my first gradient. I used my usual SH Double Duty base, and added two coats of Orly Cotton Candy. I let that dry, then I grabbed a makeup sponge. I painted Orly Wild Wisteria and more Cotton Candy onto the sponge. I sponged this onto each of my nails. Then I topped them all with a coat of SV. Since this was my first time, my index finger experienced the strongest learning curve! LOL
With the index finger, I learned that if you don't pay attention and start moving the sponge down, it's very hard to go back and fix it! No, you can't paint on more of the pink and try to cover it. And no, you can't paint more pink directly on the nail and try to sponge it to blend it back in. Yup, tried that, too! :oD
With my middle finger, I learned that putting tape around your finger will help cut down on cleaning up. However, I also learned that you need to pay close attention to make sure you haven't put tape over your nail at all. See that sharp line near the cuticle edge that is very pink with no purple? Yup, that's what happens when you inadvertently cover part of your nail with tape. Which leads me to my final lesson learned. I actually learned this lesson with my index finger, but I was already committed.
Whatever color you use as your base, use that color for the cuticle edge of your gradient. Otherwise, it will look like mine, with a line of your base color showing around the edges. No matter how much you try to sponge the second color around the edges of the nail near the cuticle, you will get more color on your cuticles than the edges of the nail.
Hopefully, some of you will benefit from my mistakes. And hopefully, my future attempts will look much better!
With the index finger, I learned that if you don't pay attention and start moving the sponge down, it's very hard to go back and fix it! No, you can't paint on more of the pink and try to cover it. And no, you can't paint more pink directly on the nail and try to sponge it to blend it back in. Yup, tried that, too! :oD
With my middle finger, I learned that putting tape around your finger will help cut down on cleaning up. However, I also learned that you need to pay close attention to make sure you haven't put tape over your nail at all. See that sharp line near the cuticle edge that is very pink with no purple? Yup, that's what happens when you inadvertently cover part of your nail with tape. Which leads me to my final lesson learned. I actually learned this lesson with my index finger, but I was already committed.
Whatever color you use as your base, use that color for the cuticle edge of your gradient. Otherwise, it will look like mine, with a line of your base color showing around the edges. No matter how much you try to sponge the second color around the edges of the nail near the cuticle, you will get more color on your cuticles than the edges of the nail.
Hopefully, some of you will benefit from my mistakes. And hopefully, my future attempts will look much better!
Labels:
Gradient,
Orly,
Pink,
Purple,
Sally Hansen,
Seche Vite,
Tip
07 June 2012
I'm Swatchin' You - Sally Hansen Lively Lilac
Hello everyone! This is a SH Intsa-Dri called Lively Lilac. While I have a lot of purple in my stash, I do not have many light purples. So when I saw this sweet little polly on sale for half price, I grabbed it. I can safely report that I am still no fan of the flat paddle brushes that SH is so fond of manufacturing lately. I do love and appreciate the fact that the tip is rounded, but the width does not play well with my narrow nail beds. I have also noticed that the bristles are super soft and silky, so their polishes do apply quite nicely. The color is a beautiful purple cream that was opaque in one coat. I did a second coat just because. And the formula was great.
SH Double Duty and SH Insta-Dri for base and top.
Labels:
Purple,
Sally Hansen,
Swatch
06 June 2012
I'm Swatchin' You - Orly Au Champagne
Good morning! Today's polish was my very first Orly, and it's Au Champagne from the Holiday Soiree collection. Thank goodness this was my first one, because I am an Orly addict now! I just love their polish. Au Champagne is a beautiful white pearl shimmer. Application was an absolute dream. It was opaque in two coats, which is what you are looking at. Also, Orly's brush (IMO) is fantastic! I am seriously lovin' me some Orly, and so excited to use them more!
SH Double Duty and SV as base and top.
![]() |
| Shade |
![]() |
| Sunlight |
Labels:
Orly,
Sally Hansen,
Seche Vite,
Swatch,
White
05 June 2012
Tiered Shelves Revisited, the Stash, and Stuff
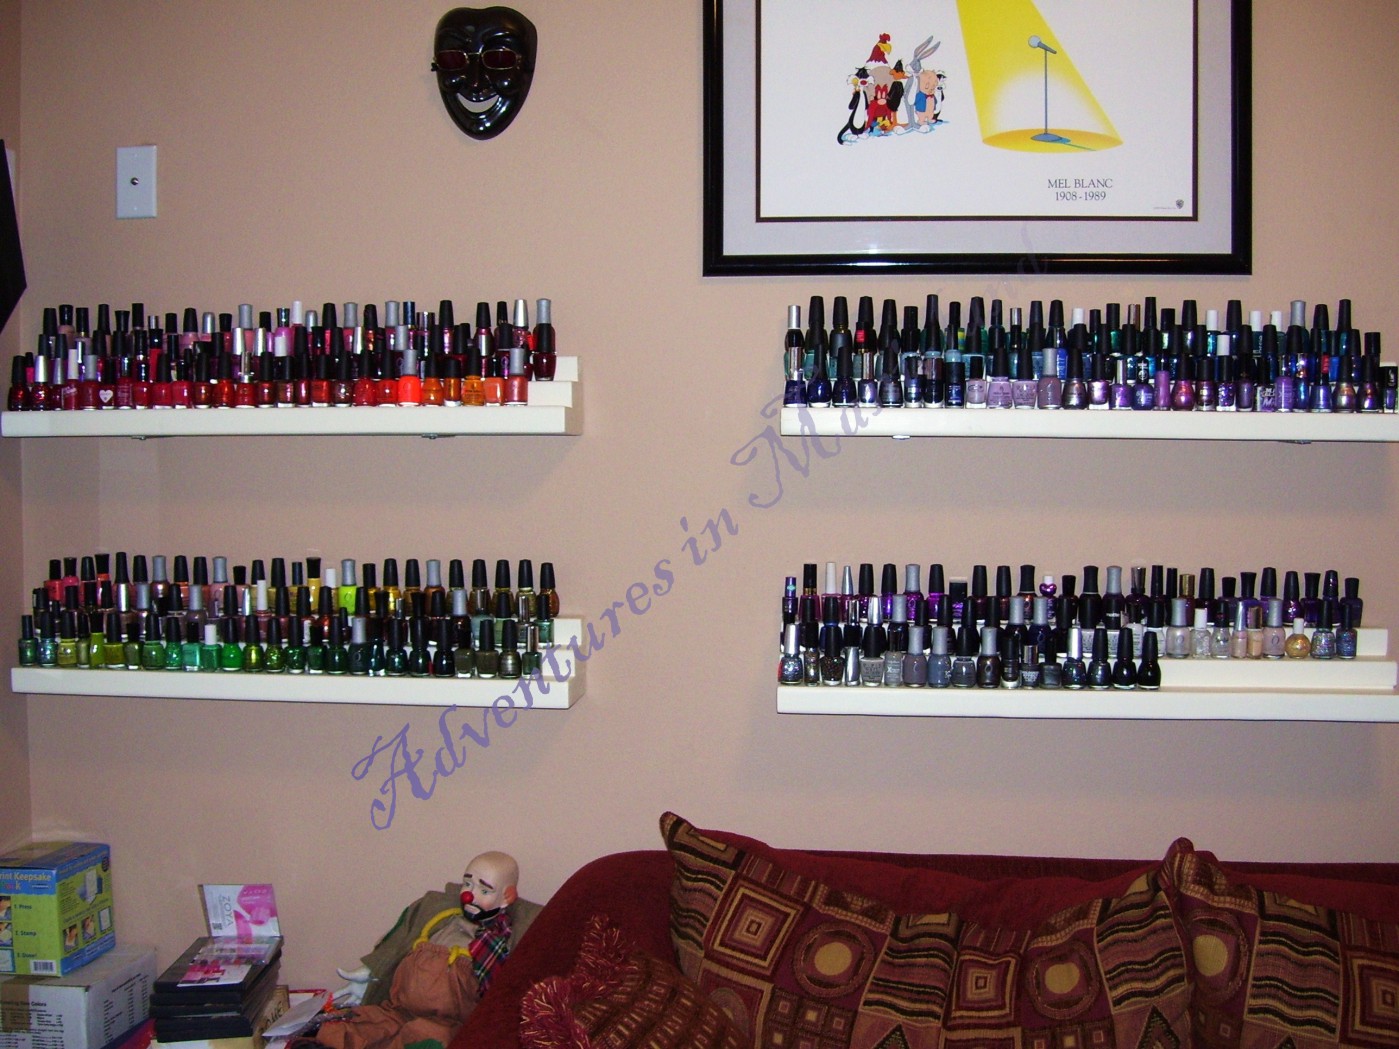
This isn't a tip, trick, or tutorial, but it relates back to the tutorial I did on making these tiered shelves. You can find the original post and tutorial on how to make them here. Well, I have since made two more. And, I finally populated them with my newly organized stash! I had my pollies organized by brand, then color. But I found that most of the time, I go looking for a general color, rather than a particular color or brand. So I re-organized by color only. Which is actually really hard to do! So, it is just generally organized by color. I actually find what I am looking for much faster now. Take a look!
I also wanted to let you guys know that I am going to be gone for awhile, but I have been working very hard to line up a bunch of posts. You won't even know I'm gone! However, I won't be able to respond to your comments immediately, like I usually do. Please feel free to continue commenting, though! I promise that I will read each and every one when I get back and will respond. And I will give you all the details, and hope to have some surprises, when I get back. So stay tuned!
Next, I am starting to run out of ideas for Tips, Tricks, and Tutorials Tuesdays. I am thinking I would like to come up with another series for Tuesdays once I get back. I would love your feedback and ideas! Think about it, and leave comments over the next couple of weeks. I really appreciate your ideas!
To close, I thought I would show you a couple of things I've made recently. I know I don't always get too personal (except for when I have responded to blog awards and tags). So here is a little personal tidbit for you. In my spare time, which is sparse, I like to knit. However, I hate knitting anything that will take too long. So I stick to hats, scarves, and things that I affectionately call "stuff." If you entered either of the giveaways I hosted on my blog, you know that I asked some "odd" questions for the blog post comment entries. Now that the winners have received their packages, I thought I would explain. For the 50 follower giveaway, I asked what was your favorite fruit. The winner said she liked tangerines, so I knit one for her. In knitting, it's a little difficult to distinguish between an orange and tangerine, so I knit a longer, thinner leaf for the top.
For the 100 follower giveaway, I asked for two colors you liked together. The winner specified purple with grey, so I knit her a cup cozy in those colors.
Enjoy the rest of your day!
I also wanted to let you guys know that I am going to be gone for awhile, but I have been working very hard to line up a bunch of posts. You won't even know I'm gone! However, I won't be able to respond to your comments immediately, like I usually do. Please feel free to continue commenting, though! I promise that I will read each and every one when I get back and will respond. And I will give you all the details, and hope to have some surprises, when I get back. So stay tuned!
Next, I am starting to run out of ideas for Tips, Tricks, and Tutorials Tuesdays. I am thinking I would like to come up with another series for Tuesdays once I get back. I would love your feedback and ideas! Think about it, and leave comments over the next couple of weeks. I really appreciate your ideas!
To close, I thought I would show you a couple of things I've made recently. I know I don't always get too personal (except for when I have responded to blog awards and tags). So here is a little personal tidbit for you. In my spare time, which is sparse, I like to knit. However, I hate knitting anything that will take too long. So I stick to hats, scarves, and things that I affectionately call "stuff." If you entered either of the giveaways I hosted on my blog, you know that I asked some "odd" questions for the blog post comment entries. Now that the winners have received their packages, I thought I would explain. For the 50 follower giveaway, I asked what was your favorite fruit. The winner said she liked tangerines, so I knit one for her. In knitting, it's a little difficult to distinguish between an orange and tangerine, so I knit a longer, thinner leaf for the top.
For the 100 follower giveaway, I asked for two colors you liked together. The winner specified purple with grey, so I knit her a cup cozy in those colors.
Enjoy the rest of your day!
04 June 2012
I'm Swatchin' You - Icing Magnetix Gold
Today, I'm showing you an Icing Magnetix polish. It doesn't have a name, so I'm just calling it Gold. Original, right? Anyway, the brush was craptastic. I think I actually took a picture of it for my brush comparison post here. Otherwise, it actually went on quite nicely with good coverage. I've heard that people do one coat and then a second coat using the magnet. I just tried one coat since it seemed to go on so well. I have to say, the magnet was freakin' awesome! Worked like a charm with no problems. But since I only did one coat and thanks to the strength of the magnet, you can kind of see some thin spots. Lesson learned. Base was SH Double Duty and no top coat.
Labels:
Gold,
Icing,
Magnetic,
Sally Hansen,
Swatch
01 June 2012
Feature Friday - Bubblegum Stripes
Here is a quick mani I did mainly to try stamping with stripes again. As you can see, I STILL cannot stamp stripes straight (a little alliteration for you there). :oD
I started with my base of SH Double Duty, and added two coats on SHXW Bubblegum Pink. I stamped using the stripes on Cheeky's CH6 plate, shown below.
The stripes were stamped using SC Snow Me White. I topped them off with a coat of SV. Someday...I will stamp straight lines! Until then, they will be slightly skewed, like the rest of my world. :oP Have a great weekend, everyone!
I started with my base of SH Double Duty, and added two coats on SHXW Bubblegum Pink. I stamped using the stripes on Cheeky's CH6 plate, shown below.
The stripes were stamped using SC Snow Me White. I topped them off with a coat of SV. Someday...I will stamp straight lines! Until then, they will be slightly skewed, like the rest of my world. :oP Have a great weekend, everyone!
Labels:
Cheeky,
Pink,
Sally Hansen,
Seche Vite,
Sinful Colors,
Stamp,
Stripes,
White
Subscribe to:
Posts (Atom)